
1) WHAT IS APERTURE?

The aperture refers to the size of the opening in the lens through which the light enters the camera. The size of this opening can be adjusted and the aperture size is measured in f-stops. The image on the right shows you exactly what the aperture on a lens looks like.
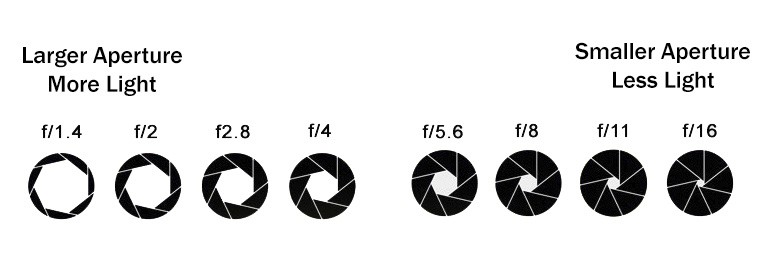
When you change the f-stop value, you change the size of the opening. Here’s the weird thing though. The higher the f-stop, the smaller the opening.
Take a look at the chart below to see what different apertures look like at different f-stops. On the far left, you can see that setting an aperture of f16 will result in a small opening. Choosing an aperture of f1.4 will result in a very wide opening.
2) WHAT IS SHUTTER SPEED?
Inside your camera, directly in front of the sensor, is a small flap called the shutter. When you take a photo, this opens and closes to let light reach the sensor, creating your image. Shutter speed describes how quickly or slowly the shutter opens and closes again.
A fast shutter speed means that the shutter is only open for a short period of time; a slow shutter speed means the shutter is open for longer.

SHUTTER SPEED MEASURED
Shutter speeds are measured in seconds, or fractions of a second. For example, a shutter speed of 1/100 means 1/100th of a second, or 0.01 seconds. This is also known as the “exposure time”, because it’s the amount of time the sensor is exposed to light.
Most cameras offer a wide range of shutter speeds, starting at just a few thousandths of a second and going up to several seconds. SLRs also have a “Bulb” mode where you can hold the shutter open for as long as you want.
CHOOSING THE BEST SHUTTER SPEED
In automatic mode, your camera will try to guess the best shutter speed to capture your scene. Unfortunately it doesn’t always get it right, and your photo can end up poorly exposed or blurred.
A better option is to switch to manual mode and take control of shutter speed yourself. When doing so, you need to consider the following:
CAMERA SHAKE
Camera shake occurs when hand-holding your camera. No matter how steady you think you are, you can never stand perfectly still, and this slight movement shows up in your photos as a blurriness or lack of sharpness.

Camera shake occurs when hand-holding your camera, and causes blurring of stationary objects.
You can avoid camera shake by using a faster shutter speed. It’s more noticeable when using lenses with a long focal length, so the longer the lens, the more you’ll need to increase your shutter speed to avoid camera shake.
As a rule of thumb, you should use a minimum shutter speed of 1/focal length. So for a 200mm lens, use a shutter speed of at least 1/200th. When calculating this, use your lens’s effective focal length, which is found by multiplying the focal length by your camera’s crop factor.
MOTION BLUR
Motion blurring happens when you’re photographing a moving subject, let’s say a runner. If you use a slow shutter speed, the runner will move across the frame while the shutter is open, causing them to appear as a blurry streak in the final image.

Use a fast shutter speed to eliminate motion blur, or use it creatively to convey movement and speed.
You can avoid motion blur by using a faster shutter speed. Doing so means that the subject will move less while the shutter is open, reducing the blurring effect. With a fast enough shutter speed, this blurring becomes unnoticeable, and the action appears “frozen”.
But before you go cranking your shutter speed as high as you can, you should consider whether you actually want to eliminate motion blur. It’s an excellent way to convey speed or movement in a scene. You can also pan your camera to keep the subject sharp and blur the background.
EXPOSURE
You also need to make sure that your scene is properly exposed. A slower shutter speed lets in more light, while a faster shutter speed lets in less. You need to choose a shutter speed that lets in just the right amount of light, to give a photo which isn’t too bright (overexposed) or dark (underexposed), and which has a good level of detail in the most important areas.

Choosing the right shutter speed is important in achieving perfect exposure, with good detail in the highlights and shadows.
Remember that exposure isn’t just about shutter speed – it also depends on your aperture and ISO speed. A good technique is to choose a shutter speed which gives the desired amount of blurring (if any), and then adjust your aperture and ISO to give a good overall exposure.
CREATIVE EFFECTS
By using very short or very long shutter speeds, you can introduce some interesting creative effects into your shots.
Long exposure photography is where you open the shutter for much longer than normal – anything from a few seconds to several minutes. This is perfect for creating blurred crowd shots, giving moving water a fog-like appearance, and capturing trails of light from things like cars and stars.

A very slow shutter speed can be used for interesting abstract effects such as making water appear misty and smooth.
Alternatively, by using a very fast shutter speed you can capture some stunning “frozen” motion, such as birds in flight, sportsmen in action, or water splashing. These types of shots often require lots of trial and error, but they’re truly fascinating when they work.

Use a very fast shutter speed to freeze motion.
There’s no end to the interesting effects you can create by varying your shutter speed. Don’t be afraid to experiment or use settings that you’d normally avoid – you never know when you’ll find a way to bring a new perspective to a common subject.
The best way to learn about shutter speed is to flick your camera into manual or shutter priority mode and play around. Pay attention to the effect on exposure and blurring, and see how you can use that knowledge to bring a new level of creativity to your photos.
3) WHAT IS EXPOSURE?
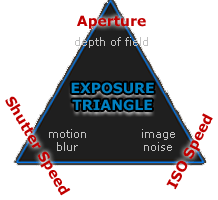
THE EXPOSURE TRIANGLE EXPLAINED
Creating a harmonious exposure using the aperture, shutter speed and ISO is a juggling act. As soon as you make a decision about one element, you’ll need to compromise with another.
The trick to balancing The Exposure Triangle is to get all three elements working together so you get the results you want ,and not what the camera tells you you can have.
Because of that, it’s really worth putting in the groundwork and getting to grips with the basics of shutter speed (how long the camera’s sensor is exposed to the light), what an aperture is (how much light the lens lets in, which also affects depth of field) and ISO (the sensitivity level of the sensor). Once you know how to do this, there’s nothing you can’t do.
In addition to their role in exposure, the choice of aperture, shutter speed and ISO have a significant impact on the look and feel of your pictures.
Aperture, as we mentioned above, affects the depth of field, or how much of an image appears sharp. Shutter speed also affects image sharpness, with slower shutter speeds leading to blurred images – whether that’s caused by the subject moving or the camera not being held still.
The choice of ISO enables you to use the optimum combination of aperture and shutter speed when the amount of light would normally prevent you from doing so. However, increasing the ISO also reduces the quality of your images.
Use the exposure triangle to decide how to adjust the exposure: the key is that when you increase the exposure for one element (a yellow arrow), you need to reduce it for one or both of the other elements (the grey arrows) in order to maintain the same exposure.
The camera can do this for you in Program, Aperture Priority or Shutter Priority, but it’s something you’ll need to consider when shooting in Manual mode.
Get the hang of this relationship, and you’ll gain much more control over the look and feel of every image you capture.
It’s also worth remembering that at one time, shutter speed and aperture were the only exposure variables you could change from one shot to the next as the ISO was set by the type of film you were using, but the introduction of digital cameras has made it possible to change ISO on the fly rather than unloading film or switching bodies.
Your DSLR camera is like your head with the LENS being your vision and the camera BODY is your brain. Your vision sees things and your brain records the details.

Just like when you look at something – let’s say, a flower – your eyes see it and send information to your brain that the flower has long petals and that it is yellow. If you looked at it too quickly or it was too dark, for example, the information your brain records is compromised.
The “exposure triangle” is about how 3 things — aperture, shutter speed and ISO — work together to provide enough light for your brain (the camera) to record what you see. You need the right combination of these 3 components to have perfect exposure.

For example, if you don’t let in enough light, you won’t see things very well because it’ll be too dark (underexposure).

If you let in too much light, then it’ll be too bright and you can’t see a lot of the details (overexposure).

APERTURE = how WIDE you open your eyes
A small aperture (a large f-stop or f-number, like f/22) is like squinting. A large aperture (a small f-stop or f-number, like f/1.4) is like having “bug eyes”.
Quiz: If you are shooting in low light, how wide do you open your eyes? Will you see well at night if you are squinting (small aperture)?
Quiz: What happens on a super bright day if your eyes are wide open and they’re open for a long time (slow shutter and large aperture)? Can you see well then?

SHUTTER SPEED = how LONG you open your eyes
A fast shutter, like 1/1000th of a second, is blinking super fast. A slow shutter speed, like 2 seconds, is keeping your eyes open and then blinking. The thing to remember is: your brain is recording everything when your eyes are open. So if you or something you’re looking at is moving, and your eyes are open a long time (slow shutter), then your brain will record a blurry image.
Quiz: If you want a crisp shot of someone jumping, how long do you need your eyes open? What will freeze the shot: a quick blink (fast shutter) or a slow one (slow shutter)?

ISO = special glasses that help you see in the dark
ISO is like the opposite of sunglasses. Let’s call them MOONglasses! 😉
The higher the ISO, the thicker your moonglasses, so the more you are able to see in low light. You need thick moonglasses (high ISO) when shooting indoors or at dusk. You need very thin moonglasses (low ISO) when it’s a sunny day.
Quiz: do I need thick, thin or medium moonglasses if I’m shooting at the beach on my lunch break?
All 3 of these things work together
Here is an example: You are photographing your sleeping cat who is snuggled on the couch. There is not much light coming through the windows or additional ambient light. To see well, you have medium-to-thick moonglasses on (such as ISO 600). You need to have your eyes open pretty wide (large aperture, such as f/1.4). However, you don’t have great vision (you have a kit lens that only goes up to f/4.5), so you need more light to see. Thus, you leave your eyes open longer (slow shutter speed, such as 1/30th sec).
4) WHAT IS COMPOSITION?
Simply put, composing an image means arranging elements within it in a way that suits the core idea or goal of your work best. Arranging elements can be done by actually moving the objects or subjects. A good example for this case is portrait or still life photography. Street photography involves anticipation, since the photographer doesn’t usually have the choice of moving his subjects himself, but has to wait for them to take the most suitable position within the frame. Another way of arranging elements is by changing your own position. Such a way is appropriate in circumstances that do not allow the photographer to physically move anything, like landscape photography.
Composition is a way of guiding the viewer’s eye towards the most important elements of your work, sometimes – in a very specific order. A good composition can help make a masterpiece even out of the dullest objects and subjects in the plainest of environments. On the other hand, a bad composition can ruin a photograph completely, despite how interesting the subject may be. A poorly judged composition is also not something you can usually fix in post-processing, unlike simple and common exposure or white balance errors. Cropping can sometimes save an image, but only when tighter framing and removal of certain portions of the image is the correct solution. That is why giving your choice of composition plenty of thought before capturing an image is a step of utmost importance.
5) WHAT IS RULE OF THIRDS?
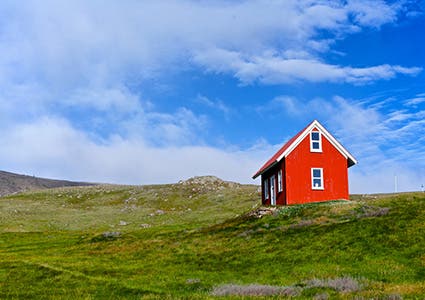
The rule of thirds involves mentally dividing up your image using 2 horizontal lines and 2 vertical lines, as shown below. You then position the important elements in your scene along those lines, or at the points where they meet.

A rule of thirds grid. Important elements (the shed, and the border between the ground and the trees) are positioned along the lines and at the intersections. Image by Martin Gommel.
The idea is that an off-centre composition is more pleasing to the eye and looks more natural than one where the subject is placed right in the middle of the frame. It also encourages you to make creative use of negative space, the empty areas around your subject.
USE THE RULE OF THIRDS
When framing a photo, imagine the scene divided up as above. Think about what elements of the photo are most important, and try to position them at or near the lines and intersections of the grid. They don’t have to be perfectly lined up as long as they’re close.

The horizon and main subject in this photo have been positioned near lines or intersections for maximum impact.
You may need to move around to get the best composition. This forces you to think more carefully about the shot, and is a good habit to get into whether you’re using the rule of thirds or not.
To help you out, some cameras have a setting which overlays a rule of thirds grid onto your photo. This removes all guesswork and helps you get your positioning even more accurate.
EXAMPLES
The rule of thirds is very versatile and can be used on any subject. Below are some example of it being used effectively in different types of shots.

In landscape shots, it’s common to position the horizon along the centre of the frame, but this can give the photo a “split in two” feel. Instead, place it along one of the horizontal lines.
Try to include another interesting object, such as the tree in the photo above, and position it according to the rule of thirds. This provides an “anchor”, a natural focal point for the scene.

It’s a good idea to position people off to one side of the frame. This provides some “breathing space”, shows the subject’s environment, and stops the photo from looking like a mugshot.
We are naturally drawn to people’s eyes. Place them at one of the intersections on the rule of thirds grid to give the shot a clear focal point.

Here the main subject has been placed at one of the intersections, and also along one a vertical line. The twig roughly follows the top horizontal line. The empty space at the bottom left provides balance and prevents the picture from feeling overcrowded.

Vertical subjects such as this lighthouse can split a photo in two, in much the same way as a horizon can do horizontally. To avoid this, position them off-centre in your composition.

When photographing moving subjects, position them as normal, but also pay attention to the direction they’re moving. As a general rule you should leave more space in front of them than behind, to show where they’re going.
6) WHAT IS DEPTH OF FIELD?/depth-of-field-57c7d1835f9b5829f409420b.jpg)
-
A common term in photography, depth of field is important to consider when creating any photograph. It is used at varying degrees to place either everything in the image into a sharp focus or to narrow the focus and highlight a subject, allowing other elements to be blurry.
Photographers use depth of field to create certain effects and draw the viewer’s attention to particular elements of the scene. It is important to understand how the aperture setting on your camera, the focal length of the lens, and the distance of your subject affects a photograph’s depth of field.
What is Depth of Field?
Depth of field is the amount of your image before and beyond your focus point that will be in focus. You should understand what depth of field is because it will tell you whether or not your subject and background can be sharply focused at the same time.
Depth of field is determined by three primary factors:
- Aperture/F-Stop
- Lens
- Subject Distance
While the camera can actually only focus on one tiny point in space, the depth of field determines how much of the image is in “acceptable focus” to the human eye.
- In subjects such as landscapes, a large depth of field is often desired so that the entire scene appears to be in focus.
- In subjects such as portraits, a small depth of field is often used to blur the background and reduce distractions from the main subject of the image.
The Effect of Aperture/F-Stop on Depth of Field
The primary control of depth of field is the aperture, or f-stop, setting on your camera. Apertures range from f/1.8-f/64 and each lens you place on your camera will have a different aperture range which is indicated on the lens itself.
What is Aperture?
Aperture describes an adjustable opening inside your camera lens that controls the amount of light striking the film or digital sensor. As the size of the aperture changes, the angle of light striking the film or sensor also changes. It is this angle change – much like eyeglasses change the angle of the light – that creates a change in the depth of field.
Aperture is measured by f-stops on your camera controls. F-stop settings represent a ratio derived from the size of the lens opening and the focal length.
Aperture has historically been confusing for new photographers (and some established photographers) because of the apparent conflict in its description: a small f-stop is a large aperture opening and a large f-stop is a small aperture opening. Because a smaller aperture limits the amount of light entering the lens, a large f-stop (smaller opening) also requires more light to properly expose an image.
A simple way to remember the relationship between F-Stop/Aperture and Depth of Field is:
- Large F-Stop = Large Depth of Field = More Light Needed
- Small F-Stop = Small Depth of Field = Less Light Needed
This means that:
- Larger f-stops, such as f/11, will require slower shutter speeds or more light and produce images with larger depths of field (more of the scene is in focus).
- Smaller f-stops, such as f/4, will allow faster shutter speeds or less light and produce images with shallower depths of field (less of the scene is in focus).
The Effect of Lens Size on Depth of Field
The focal length of your lens plays a big part in determining the depth of field (DOF) for your images as well.
How Focal Length Affects Depth of Field
Think of your lens strength as a limiting factor for your aperture capabilities. The higher the magnification factor, the smaller the depth of field will be, even with large f-stop settings.
The depth of field progression for a 70-300mm lens:
- 70mm = largest DOF
- 100mm = large DOF
- 200mm = small DOF
- 300mm = smallest DOF
This effect is especially pronounced in macro photography where the close proximity to the subject and high focal lengths result in depths of field that are sometimes less than an inch.
-
The Effect of Subject Distance on Depth of Field
Much like lens strength, subject distance, plays a big part in determining the possible depth of field in an image. The closer you are to your focal point or subject, the less depth of field is possible.
How Distance Affects Depth of Field
To illustrate this effect, hold your hand at arm’s length in front of your face. Even when focusing on your hand you can probably see a good bit of the surrounding environment in reasonably clear focus.
Slowly move your hand toward your face until you reach the half-way point. Notice how much less of the area surrounding your hand is in focus. Continue moving your hand closer until it is as close as your eyes can focus on it and notice that very little of the area surrounding your hand can now be seen.
This same effect occurs with your camera lens.
- This effect, combined with high magnification factors, results in the tiny depth of fields seen in macro photography.
- It also makes the huge depths of field in many expansive landscapes possible when using a lower magnification factor lens.
See the Effect of Depth of Field For Yourself
It is easy to do a test so you can experience how to control the depth of field and get a visual for its effect on your photographs. To do so, it is best to use a tripod as shutter speeds will vary.
- Set your camera on the manual or aperture priority setting and do not change the focal length of your lens.
- Focus on your subject and set the camera at the smallest f-stop possible (for example, f/3.5). Take a photograph.
- Without moving the camera or the focus point, set the camera for a middle-range f-stop (for example, f/5.6 or f/8). Take a photograph.
- Again, without moving the camera or focus point, set the camera for the largest f-stop possible (for example, f/11 or f/16). Take a photograph.
Compare the three photographs side by side and notice how more of the scene falls into focus as you decrease the size of the aperture opening (use a larger f-stop). Also, notice that your shutter speeds have slowed down with these larger f-stops.
Note: Some camera lenses will have smaller and larger f-stops than the examples given. Use the smallest and largest available on your lens to get the full effect of depth of field.
Putting Depth of Field Control Into Everyday Practice
Take this new knowledge with you and consider it in every photograph you take. It will give you greater control of your images and can be used for various effects.
Photographers will use depth of field to their advantage in various situations:
- Landscape photographers often use large f-stops to increase the depth of field in a scene.
- Portrait photographers often use small f-stops to decrease the depth of field in a scene, drawing the viewer’s focus to the subject’s eyes and face. Note that with large groups, you need a depth of field that will get every person in focus.
- Sports photographers will often use small f-stops to decrease the depth of field and allow the focus to be on key athletes while blurring the background. This also helps decrease shutter speeds in order to stop the fast action.
/depth-of-field-comparision-56a727945f9b58b7d0e75f7b.jpg)
/depth-of-field-mm-compariso-56a727945f9b58b7d0e75f81.jpg)
/depth-of-field-thirds-rule-56a727945f9b58b7d0e75f78.jpg)
7) WHAT IS BALANCE?
Balance in photography is observed when an image has subject areas that look balanced throughout the composition. It is achieved by shifting the frame and juxtaposing subjects within it so objects, tones, and colors are of equal visual weight. An image is balanced when subject areas command a viewer’s attention equally.
There are two main techniques of balance: formal and informal. However, there are also other kinds of formal and informal techniques that photographers have been practicing to balance out lightness and heaviness, varying shapes, and even meanings behind a composition.
Below you’ll find the five types of balance in photography to help you create more visually appealing and meaningful photographs.
Symmetrical Balance
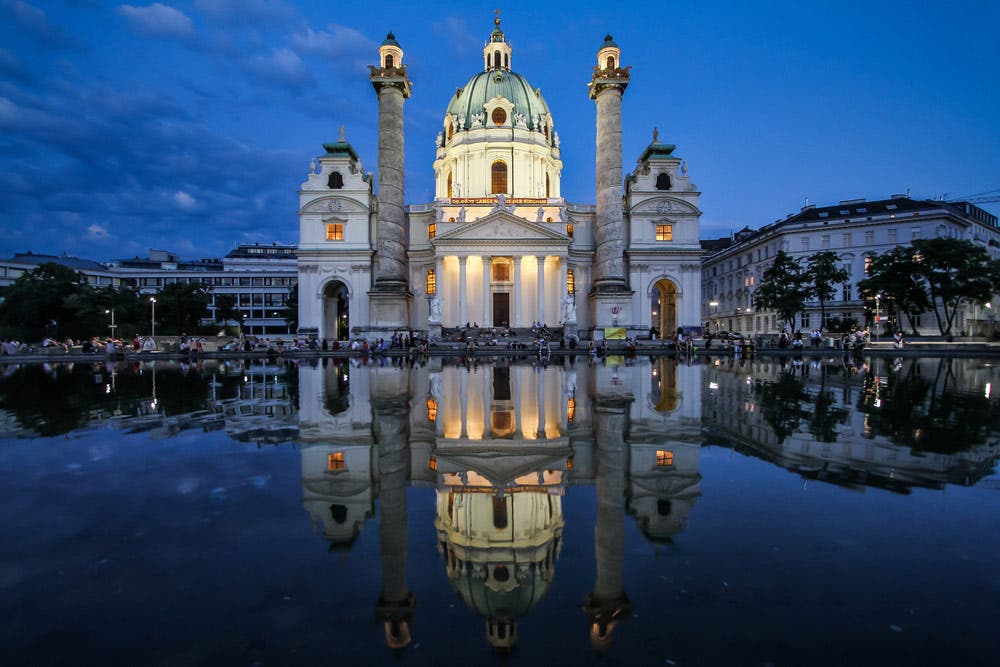
Also called formal balance, symmetrical balance is the most common way to photograph an image. After all, it’s natural for for people to place their main subjects right in the middle of the frame. Professionals and photography workshops often advise new photographers to avoid shooting their subjects front and center, but in this case, it works perfectly in giving subjects some visual emphasis and appeal.
In symmetrically balanced photos, both sides of the frame have equal weight and may even mirror each other. Subjects are intentionally centered to look perfectly symmetrical when split horizontally or vertically in half.
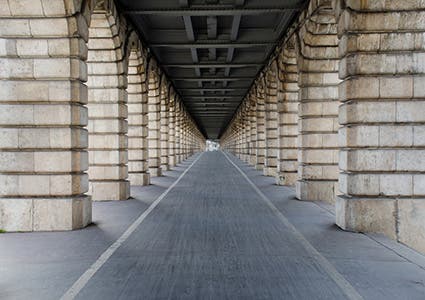
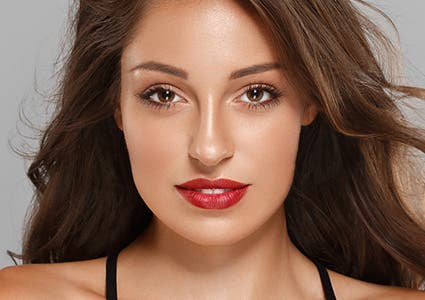
In the photo above, both the St. Charles church in Vienna and its mirror image on the pond are centered to create a symmetrical image. The passage below has balanced framing lines and borders that lead the eye to the middle and add visual appeal. Finally, even though it’s usually not advisable to shoot portraits with the person right in the middle of the frame, it’s a good compositional technique for red carpet candids and beauty close-ups.
Asymmetrical Balance
Also known as informal balance, it’s the most common compositional technique taught in photography and art workshops. Since it requires intentionally placing your subject off center, it’s more difficult to achieve but gets easier with daily practice.
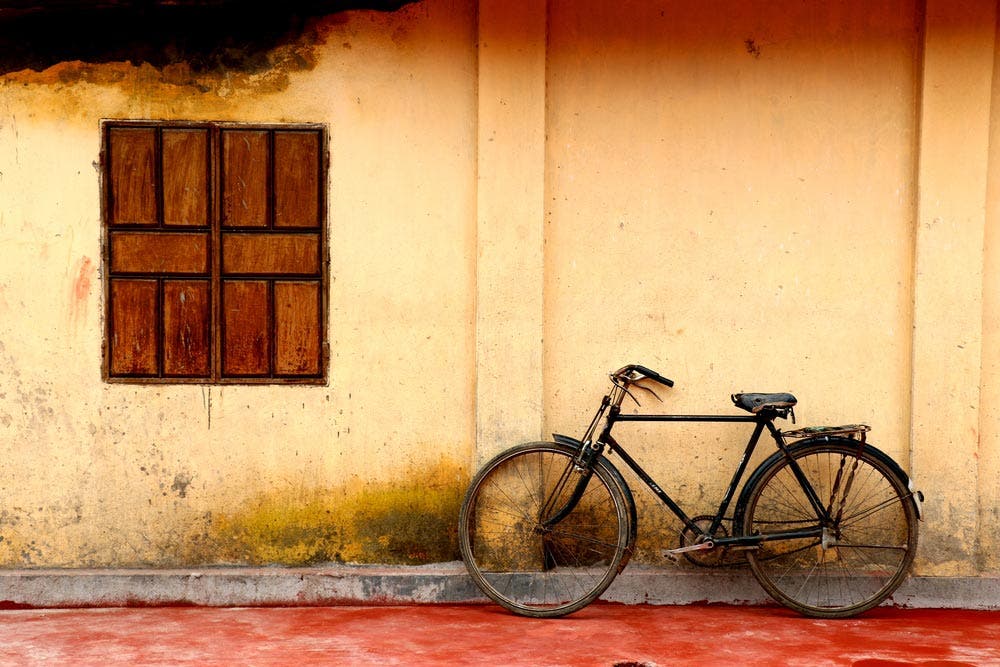
The rule of thirds puts asymmetrical balance to your advantage, as it suggests that the center of interest lies along the intersecting lines of an image that is divided vertically and horizontally by four lines. Other ways to create asymmetrical balance is by balancing out your main subject with another, less important subject by contrast in their outward physical appearance within the composition.
Take the image of the window and bike above. Not only are the subjects placed on the left and right side of the frame, they compliment each other by varying in size, thus creating balance in both size and subject placement.
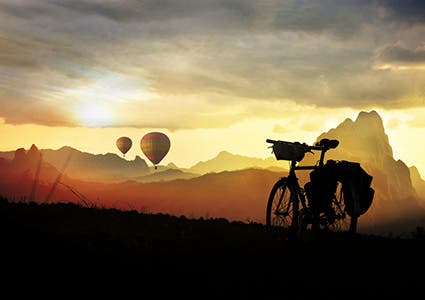

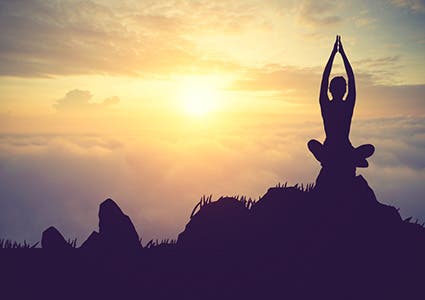
In the landscape photo above left, the horizon and the setting sun are placed along the lines observed by the rule of thirds, and the brighter areas of the sky and water are balanced by the darker area of the stones in the foreground.
In the photo on the right, the differently sized subjects (bigger silhouetted bike and smaller hot air balloons) and the contrasting tones between the upper and bottom part of the frame create asymmetrical balance within the composition.
Color Balance

Another interesting way to create asymmetrical balance by use of colors. As you can imagine, a photo with too many vibrant colors, such as reds and oranges, may make an image look overwhelming. Color balance can be achieved by balancing out a small area of vibrant color with a larger area of neutral or more pastel colors.
In the image above, the rainbow-colored abacus beads would have been too heavy on the eyes if it were placed on a colored surface instead of a plain, white surface. Both images below were placed off center and are not balanced out by a second subject, but are balanced out by more neutral and less striking colors around them.

Tonal Balance
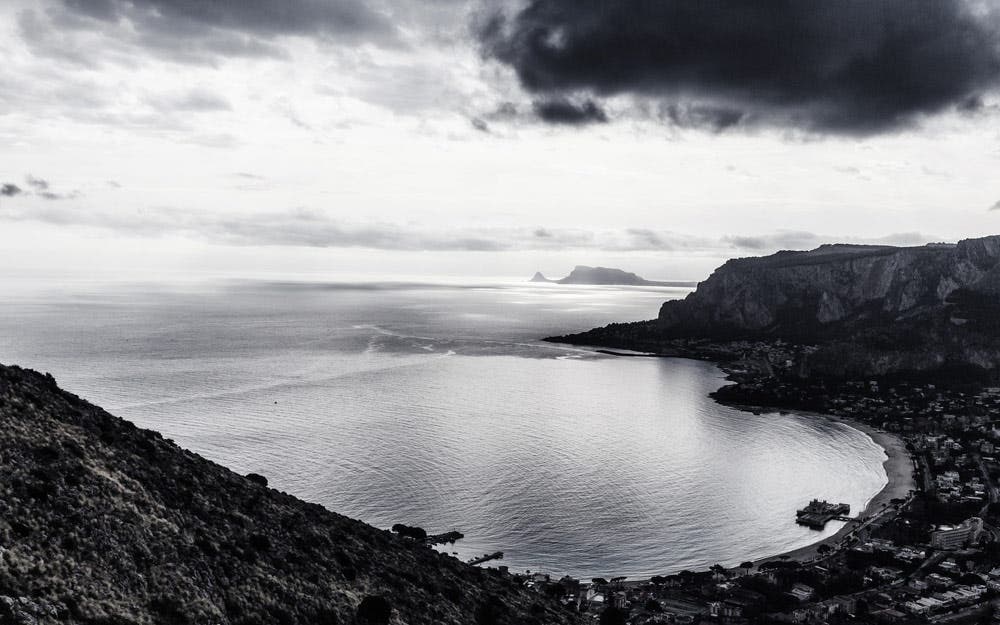
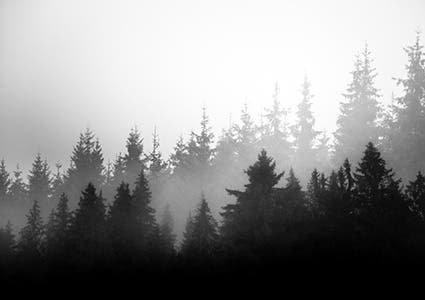
This kind of asymmetrical balance is best observed in monochromatic, black and white images where different tones are easily distinguishable. In this case, tonal balance is seen in terms of contrast between lighter and darker areas within an image.
Like bright colors, darker areas are “heavier” on the eyes and are best balanced out by bigger, lighter areas. These are observed in the photos below, where the foregrounds are darker and are in harmony with the lighter backgrounds. The fact that the foreground subjects also observe the rule of thirds add visual appeal to the images.
Conceptual Balance
Conceptual balance is the more philosophical type of asymmetrical balance where two subjects complement each other and are different beyond size, shape and form. In many cases, conceptual balance is achieved in an image where there are two contrasting textures or meanings behind its subjects. That said, it is obviously harder to compose a conceptually balanced image as it usually takes more than just a tilt of the frame.
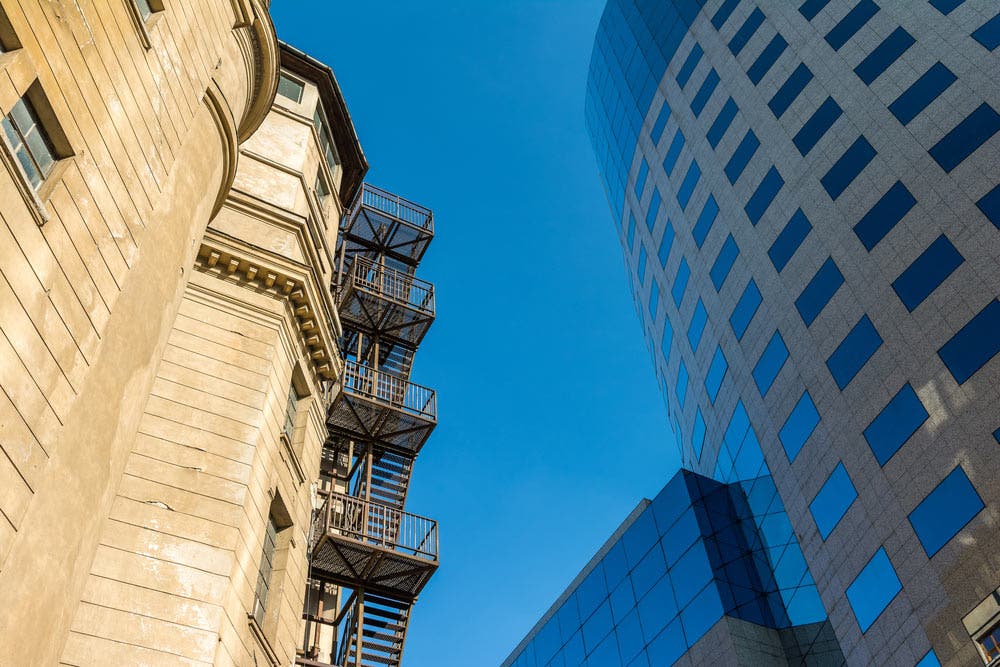
In the photo above, the two subjects (an old building and a high-rise glass building) are placed on the left and right sides of the frame. In addition to asymmetrical, color, and tonal balance, conceptual balance is achieved as the buildings showcase the effect of modernization and industrialization.
The same goes for the photo of the two kinds of windmills below. The photo of the denim pants shows color balance as well as conceptual balance, by contrast in textures between denim and the smoother, less textured surface around it.


